Friday 23 August 2024, by Moshiur Rahman
Deploying a Flask web application on a Windows IIS Server requires a series of precise configurations. This guide will provide a step-by-step, accurate, and professional approach to getting your Flask app running on IIS using FastCGI and wfastcgi.
Prerequisites
Before you begin, ensure you have:
- Windows Server with IIS installed.
- Administrator access to the server.
- Python 3.x installed from python.org.
- A Flask project ready for deployment.
Step 1: Install Python
Download Python 3.x from python.org.
During the installation, check the box "Add Python to PATH" to make sure Python is accessible from the command prompt.
Step 2: Set Up Python Virtual Environment
To create an isolated environment for your Flask project:
Open Command Prompt as an administrator.
Navigate to your project directory:
cd c:\path\to\your\project\directory
Create a virtual environment using:
python -m venv venv
Activate the virtual environment:
venv\Scripts\activate
This ensures all dependencies are installed in isolation from system Python.
Step 3: Install Project Dependencies
Once your virtual environment is active, install your Flask app dependencies:
Create or update your requirements.txt file:
pip freeze > requirements.txt
Check and Install dependencies from requirements.txt file. This file includes all the dependencies needed to your project:
pip install -r requirements.txt
This ensures your app has all the necessary packages installed.
Step 4: Install and Configure wfastcgi
Install IIS Features
- Open Server Manager, and click Add Roles and Features.
- Under Server Roles, select Web Server (IIS).
- In Role Services, scroll down to Application Development and check CGI.
- Complete the installation by clicking Next and Install.
Install and Enable wfastcgi
Now, install and configure wfastcgi, a Python package that allows IIS to communicate with your Flask app via FastCGI:
Install wfastcgi in your virtual environment:
pip install wfastcgi
Enable wfastcgi in IIS:
wfastcgi-enable
This command registers wfastcgi.py as the FastCGI script processor for Python, and you'll receive output similar to the following:
Applied configuration changes to section "system.webServer/fastCgi" for "MACHINE/WEBROOT/APPHOST"
"c:\path\to\python.exe|c:\path\to\wfastcgi.py" can now be used as a FastCGI script processor.
Make note of the scriptProcessor path from the output.
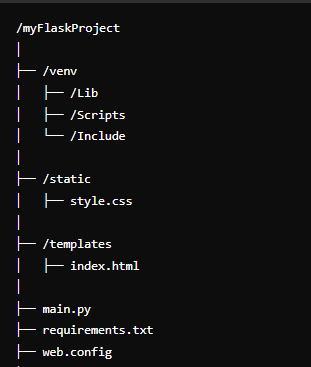
Step 5: Create the web.config File
To link your Flask app with IIS, create a web.config file in the root directory of your Flask project (where main.py is located). Here is an example of a sample flask project structure.
path="*"
verb="*"
modules="FastCgiModule"
scriptProcessor="c:\path\to\python.exe|c:\path\to\wfastcgi.py"
resourceType="Unspecified"
requireAccess="Script" />
Replace the following:
scriptProcessorwith the path you noted earlier.
WSGI_HANDLER with your_main_file_name.app (e.g., if your main file is main.py, it would be main.app).
PYTHONPATH with the path to your project directory.
Step 6: Configure IIS
- Open IIS Manager and create a new website.
- In the left pane, right-click Sites and choose Add Website Fill in your site's name, the physical path to your Flask project, and the hostname.
- Select your newly created website from the list.
- In the right-hand panel, double-click Configuration Editor.
- Unlock the system.webServer/fastCgi section to allow configurations for FastCGI.
Step 7: Grant Permissions to IIS_IUSRS
To ensure that IIS has the necessary access to your project directory:
- Right-click your project folder and select Properties.
- Go to the Security tab, and click Edit.
- Add IIS_IUSRS, and grant it Read & Execute permissions.
Step 8: Restart IIS and Test Your Application
Finally, restart IIS to apply all changes:
iisreset
Now, navigate to your server's domain or IP address in a web browser. If everything is set up correctly, your Flask app should load.
Conclusion
Deploying Flask applications on Windows IIS Server using wfastcgi can be challenging but manageable with a step-by-step approach. By ensuring Python, IIS, and Flask are correctly configured, you’ll have a fully functional web apåplication deployed on your Windows Server.