WordPress Security Tips, Plugins & FAQs
Tuesday 20 January 2015, by Lewis Swift
Being a hugely popular content management system has many upsides. WordPress benefits from being so widely-used that there are thousands of plugins and themes available, and forums full of helpful discussions if you're Googling to fix a problem.
However, there is a downside: these benefits go hand-in-hand with WordPress being a popular target for hackers and spammers, too.
Any WordPress website owner knows that you receive your first spam comments within moments of setting up your site, and dozens or even hundreds thereafter. A plugin like Akismet (handily bundled with WordPress) is essential for protecting your comments from spammy links.
But what about the more serious attempts to fill your site with links to low-quality spam sites? What do those attempts look like, and how do you defend against them?
Read on to find out exactly what you need to know to protect your WordPress website. (Or, if your site has already been hacked, click here to scroll straight to the 'Already Been Hacked?' section. Once you've sorted out your site, you can come back here to learn about protecting yourself for next time.)
What WordPress Hackers Do, And Why They Do It
WordPress hackers aim to modify your site's files and/or its database, adding malicious code that helps the hacker achieve their goals. These goals might be to create links pointing to spam/scam sites from innocent sites that have good reputations with Google (like yours). Or perhaps they want to trick the site owner into paying money to undo the hack.
Hackers will exploit vulnerabilities in plugin and theme files, as well as the WordPress core files. This is why it's so important to keep your site updated.
Finally, hackers will usually attempt to create 'back doors' in your site's code so that they can easily return to re-add their malicious code if you manage to remove it but fail to close their secret entry point. So you must be vigilant after cleaning up your site—the hacker might return quicker than you'd think.
A hacked WordPress website might look something like this:

You might see that the hacker has added lots of links to spammy sites (often related to gambling, scams and/or adult content) to the content. This isn't a tactic that works well for SEO these days, but people still do it to try to get some traffic and make some money.
The hacker might also add other text, perhaps to let you know who they are so that you might try contacting them to ask them to fix your site. This is not recommended, as it's unnecessary (you don't need their help) and you can't trust them.
A word of warning: It's possible for the hacker to hide their changes to your site from any logged-in admin users. That probably includes you. So make sure you view your site from another phone or laptop where you're not logged in when you're checking for any malicious changes. And don't forget to check several pages, not just your homepage.
Google will often detect and warn about hacked websites, so you might see the following screen when trying to visit your site:
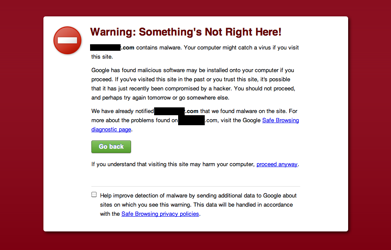
If you're using Google's Webmaster Tools (which you should be!), you might see a notification in there, too.
It can take some time for Google to notice a hack, especially if it's a subtle hack with well-hidden malicious code, so it's best not to wait for Google to tell you about a problem like this. The sections below will tell you how to make sure you find out about a hacking attempt within minutes or hours, not weeks.
WordPress Security: The Basics of Protecting Your Site (Beginners Start Here)
Right, let's get stuck into the basics. These steps are all easy and quick for any WordPress website owner to implement, and will go a long way towards protecting your site (or restoring it should the worst happen).
1. No Admin User
If you login to your WordPress website's Dashboard and click on 'Users' in the main left-hand menu, you'll see a list of the user accounts that currently exist for your site.
Do any of those accounts have a username of 'Admin'? That's a very easy name for hackers to guess, so you need to get rid of it ASAP!
If your own account's username is Admin, you'll need to create a new user account for yourself with a new and better name. Make sure to give your new account administrative priviledges (see the screencast below).
Then you can login with your new account in order to delete the old 'Admin' account.
![This short screencast shows how to create a new user account with administrative priviledges in WordPress]()
2. The Simplest Security Plugin: Limit Login Attempts
This plugin is so easy to use, you only need to install and activate it and then you're done. You can update the settings if you like.
The purpose of this plugin is to stop hackers from making 'brute force attacks' on your site, where they run a script that guesses thousands of possible username and password combinations per minute. If one of the combinations works, they've broken into your site with almost no effort at all. (This is why you should never leave your account username as 'Admin'!)
The Limit Login Attempts plugin simply blocks anyone from trying to login too many times.
The screencast below shows how to add this plugin to your site.
![This short screencast shows how to add the Limit Login Attempts plugin to a WordPress website]()
3. Keep Your Site Updated
Make sure you login to your WordPress website regularly in order to check for available updates.
The WordPress core files will need to be updated regularly, and so will your themes and plugins. Usually, themes and plugins will have updates available 1-2 days after a WordPress core update—but they may also have additional updates available at other times.

4. Don't Install Too Many Themes or Plugins
While plugins and themes are very useful, and it can take some time to find the right combinations for your site, it's important to remember that more files means more code and thus more possible security holes in your site.
Definitely remove all unused themes and plugins from your site ASAP. And try to stick to a general rule of having no more than 10 plugins installed.
If you have many more plugins than that, consider which ones might be non-essential. Are there any alternative plugins available that could do the job of 2 or more of your current plugins?
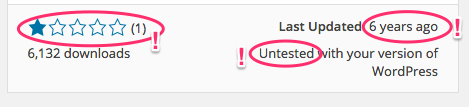
Consider the ratings and last-updated dates of the plugins you're using, too. Any with lower ratings that haven't been updated in a long time should be the first to go.
5. Run Very Regular Backups
The next plugin you need to install is one to handle backups. Do a search for backup plugins to find the one with the highest ratings and most recent last-updated date. At the time of writing, UpDraft Plus and Backup are good options.
Whichever plugin you choose, you should be able to schedule backups of your site's files and its database separately. You might find weekly file backups and daily database backups are suitable, unless you update your files (e.g. updating a custom theme) or database (e.g. new posts, pages or comments) more frequently.
Make sure to have your backups saved somewhere securely. UpDraft Plus allows you to save your backups to a Dropbox or Google Drive account, for example. You want to make sure there's plenty of space available to store your backups, so that you can keep several versions of them in case one is not suitable for restoring your site from.
The screencast below shows how to add the UpDraft Plus plugin and update its backup schedule and storage settings.
6. Choose a Good-Quality Web Hosting Company
Most hosting companies nowadays take security seriously, and some offer additional services for people who are hosting WordPress websites such as automatic updates, backups and scans.
Make sure you scout around for a good hosting company before buying a hosting package, checking all the most recent reviews and asking your friends and colleagues what they recommend.
The most important thing is that the hosting company have a responsive support team who will help you quickly should anything go wrong with your site. If you have any doubts about the support your hosting company offer, consider switching to a better company soon rather than waiting until your site has suffered an attack.
WordPress Security: The Next Steps
Now that you've got the basic WordPress security precautions in place, you might want to look at some more advanced options.
1. Use Unique Keys & Salts
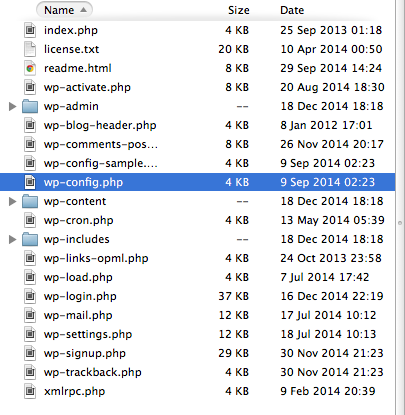
These go in your wp-config.php file, which sits in your WordPress site's root folder. To have a quick look, you can download a fresh set of WordPress files from WordPress.org, unzip them and find this file inside.
You'll want to look for the section of the wp-config.php file that says something like this:
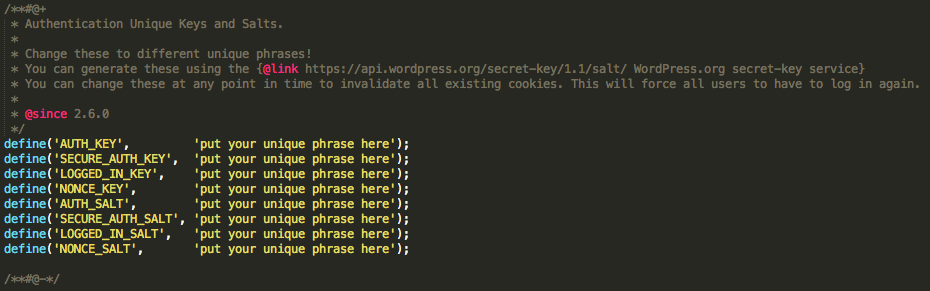
This section of the file includes instructions for how to generate the unique keys and salts (by visiting this useful generator and copying the code provided into your wp-config.php file).
Do this for your real website (instead of the test files, if you were following the steps outlined above) by connecting to your server via FTP and looking for the wp-config.php file in the website root folder.
2. Upgrade to a More Advanced Security Plugin
While the Limit Login Attempts plugin is very good at its job, it doesn't do anything other than its name suggests. You'll probably want to replace it with something more complex as soon as you can spare the time to dive into some settings.
As when looking for any important new plugin, it's a good idea to do some searching to find out which is the current best-rated and recently-updated plugin available.
At the time of writing, two well-rated advanced security plugins are Wordfence and BulletProof Security. But please do check WordPress' plugin repository to see whether there are any strong new competitors before making your final choice.
The screencast below shows how to install the Wordfence security plugin and update the settings to suit an average website. You'll likely choose some different settings to suit your site, but fortunately a good-quality plugin will have good documentation for each of its features.
A more detailed article about installing and configuring the Wordfence plugin can be found here.
Make sure you check the option to receive email alerts from your security plugin. This can help you pinpoint the date of an attack, which will help you locate a clean set of backup files should the attack have been successful.
Already Been Hacked? Do This Now:
1. Don't Panic
Firstly, try not to panic. Even if you don't have any backups, you can probably salvage most of your content. It may take some time and effort, but your website can be saved.
2. Can You Log In?
The next thing to consider is whether or not you can login to your site. The more subtle hacking attempts will not want you to be aware of the hack at all, so will not bother locking you out.
If you have been locked out, however, there are several methods available to you for restoring your access. This article from the WordPress Codex details each of them, so try each one until you've logged back into your site.
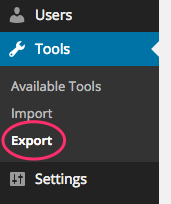
3. Export Your Content
Once you're logged in, you can do a simple export of your posts and pages from your Dashboard (click on Tools > Export from the main left-hand menu).
It's a good idea to do this export even if you also have other backups available, because it's helpful to have an extra option when it comes to restoring your site's content.
4. Clean Up Your Files
Now that you've got an Export file (and perhaps some other backups, too), you can start to clean up your site.
Firstly, connect to your site's hosting server via FTP (using a free FTP client like Filezilla—their website has easy-to-follow documentation, too) and look for your wp-config.php file in the root folder.
Firstly, you'll want to update your secret keys in order to make sure the hacker is forcibly logged out of your site. The WordPress Codex has an article with instructions on this, and they include a link to their useful secret key generator.
You might also want to make a note of the MySQL settings here by copying them and pasting them into a separate text file. Ultimately, it'll be safest for your site if you completely replace your core WordPress files, but you'll need to make sure your brand new wp-config.php file updated with the correct database information once you've done so.
Download a fresh set of WordPress files from WordPress.org/Download and unzip them. Also download and unzip fresh versions of your theme and any plugins that you were using.
Next, connect to your website's server via FTP and download the 'uploads' folder from inside your 'wp-content' folder. 'Uploads' contains all the images and videos you've uploaded to your site. It may also contain malicious code. You'll need to go through every single subfolder in this 'uploads' folder in order to delete anything that isn't an image (.png, .gif, .jpg or .svg files) or video (.flv, .mp4, .mov or .m4v files).
Now you can delete all of the remaining files on your server. Make sure everything is removed.
Next, upload your fresh version of the WordPress files. Then you can go into your new 'wp-content' folder and upload the fresh versions of your theme and plugin files (into the 'themes' and 'plugins' folders, respectively). You can also re-upload your 'uploads' folder in 'wp-content' once you've thoroughly checked it for malicious code.
Your files are now clean.
5. Clean Up Your Database
Now we want to clean up the database. If you have been taking regular backups of your database, you'll want to go through them to find the last clean one. If you've been receiving email alerts from a security plugin like Wordfence, you may have a good idea of where to start. If not, just start from the most recent backup and work your way backwards until you find a clean one.
Once you've found a hopefully-clean database backup, import it into your site's database. This will overwrite any malicious code that may have been injected by the hacker.
If your chosen backup is not clean, however, you'll need to find an older one to use. You may also need to repeat Step 4 above to clean up your site's files again, as the malicious code in your database could be capable of modifying your files.
If you don't have any database backups at all, or no clean ones, delete the database on your server and create a brand new one (using a strong username and password). Ask your web hosting company for help with this if you need it. Update your wp-config.php file with the new database's name, username and password.
You can then import the exported file from Step 3, within your site's Dashboard (go to Tools > Import) in order to safely bring in your old site's post and pages.
You may still lose some of your data using this method, such as plugin settings, so make sure to thoroughly check your site to replace your settings wherever needed. But at least it's better than not recovering anything.
6. New Passwords for Everything
Finally, make sure you've created strong new passwords for all of your WordPress-related accounts. This includes your database, if you haven't already—contact your hosting company for assistance with this if needed.
If you were using the same (or a similar) password for your WordPress site as you use for your email or social accounts, make sure to update all of those, too. And remember to use unique passwords in future! A password management app like 1Password or LastPass can help with this.
Let us know in the comments below if you've had problems with WordPress security before and, if so, how you sorted them out. What's the sneakiest hacker trick you've ever seen?
